Upcycled Pillowcase Totebag

After taking some more time off this blog I have finally returned with some new inspiration and a much better sense of what I want this blog to be about. Today I’ll be showing you the pillowcases that found a new life as a trendy totebag.

Pillowcase Totebag Upcycle

I found these pillowcases at a local thriftshop ages ago for only one buck. I picked them up because I really loved the print, but up until yesterday I had no idea what to do with them. Then I realized that, since they already look like totebags to begin with, it would be an easy upcycling project to share with you guys.

Pillowcase Totebag Upcycle

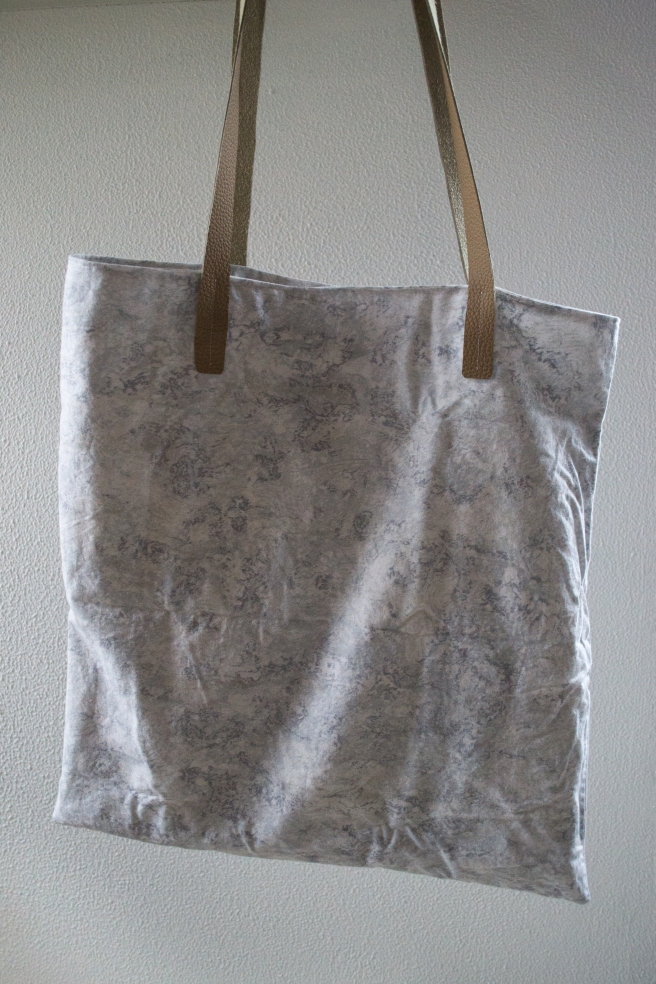
I ended up making them a little smaller by taking some length of the side and the bottom so the final bag would suit my liking. I then sewed both of them together to create a sturdy bag with a neat lining and added some topstitch to make it look a little more professional.

Pillowcase Totebag Upcycle

The straps are made from some pieces of scrap leather sewn together, but could just as easily be made from fabric or rope. I sewed them on with a simple stitch after holding them down with some glue and then my tote was complete.

DSC_0273

This proces took about an hour and a half and was incredibly rewarding as I have a new bag to show for it. My mom is already eyeing this one, so I might just make another one later today.

And how about you, have you ever made a bag yourself?

I hope you’ve had a nice day,
Quinn

Eco Dying with Blackberries

Blackberry eco dye

I spend yesterday picking blackberries and using them to create an all natural fabric dye. I would love the share this proces and especially the results with you.

Blackberry eco dye Blackberry eco dye

I first prepared my fabric by placing it in a mixture of 1 part salt and 16 parts water. I read on several websites that salt is used as a fixative for berry dyes and that I should submerge my fabric for about an hour. After this I took some berries and 3 times as much water (1 part berries, 3 parts water that is) and squashed the berries with a spoon to release the gorgeous red colour. I turned on the stove but as soon as the water started boiling I turned it off. This was because I read that blackberries start releasing tannins if they’re exposed to too much heat and this could mess with the colour I was going for.

Blackberry eco dye DSC_0303
I made three swatches. One of them left in the berry mixture for 30 minutes and the other for 60 minutes. I also tried a tiny piece of fabric that hadn’t been prepared with the salt water.  You could definitely tell that more time in the dye vat left a deeper and darker colour. I’m quite pleased with the pink’s that I achieved as I feel they posses a lot of character that is so typical for natural dyes.

Blackberry eco dye
Something did, however, catch my eye. Can you spot the darker line on the picture above? All three of my samples showed this phenomenon on the places where I hung them up to dry (does that make sense?) I have no idea how this happened since this is the first time I’ve hung dyed pieces of fabric on a drying rack, but I look forward to seeing if it will happen again.

Thank you for reading and I hope you’ve had a nice day,
Quinn

Eco-Dying with Roses Part 2

Eco Dying with Roses

My patience didn’t prove to be very good and I just couldn’t wait to unwrap the bundles I had prepared.  Of course, I decided to take pictures to share the proces with you. (By the way, you’d expect these to smell like delicious roses, but don’t be fooled. When I brought them back inside I was welcomed by the lovely smell of death).

Eco Dying with Roses Eco Dying with Roses
I cut away the strings I had used to keep my bundles together which immediately revealed a tye-die pattern amongst the shades of brown. Those shades had the same colour the water had after simmering the roses for an hour and it only occured on the outside layer of my bundle.

Eco Dying with Roses Eco Dying with Roses
Unwrapping slowly revealed a gorgeous array of autumnal shades of brown, pink purple and yellow. Sadly these hadn’t all transferred to the cloth.

Eco Dying with Roses Eco Dying with Roses
The purple petals worked out best, almost leaving me wishing that I would have only used those to begin with. The leaves transferred no colour whatsoever, but at least now I know what to do next. As I write this, the pieces of fabric are in the dryer, but I am happy to report that all of the colour survived a good rinse.

Eco Dying with Roses

I was most impressed with the leaves and petals that survived. They looked and felt like autum (every stereotypical girl’s favourite season), so I decided to dry a few as a keepsake.

Eco Dying with Roses Eco Dying with Roses
I had a really good time working on this project and I am considering starting a ‘dye-journal’ to keep track of the results of different projects. After all the only difference between science and fooling around is writing it down.

I hope you’ve had a nice day,
Quinn

Eco-Dying with Roses

Eco Dying with Roses

It has been way too hot to function around here, with temperatures rising to almost 35 degrees celsius, so life has mostly revolved around ice cubes and swimming pools. Throw in the fact that I have tons of studying to do for my final exams next week (eeeeeks!) and the amount of creativity drops quickly. Today I finally had some time to try my hand at eco-dying. I kept some ice cold water on hand and dove right in.

Eco Dying with Roses Eco Dying with Roses Eco Dying with RosesEco Dying with Roses

I used a bouqet of roses from our living room that was close to wilting completely and scattered the leaves and petals on some 100% cotton (prewashed and still damp). I did a little bit of research on the subject and learned a little about mordants and tennants, but it all sounded a bit intimidating, so I went with water and steam for my first attempt.

Eco Dying with Roses

When I was pleased with my result I wrapped my bundle around a piece of bark I had lying around in my room (yes, I am the type of girl who has bark simply cluttering her bedroom. It is a good life).

Eco Dying with Roses Eco Dying with Roses  After that I wrapped my bundles in some yarn to make sure everything would stay in place and then left it to simmer on the stove for about an hour. The pieces of bark were a little too large for my pot so I turned them around after half an hour.

The bundles are currently lying out in the sun to dry where I will leave them for a couple days as recommended on several of the sources I used when researching. I find it a little bit frustrating that I don’t have immediate results with this project, so it’s probably a good thing that it is so hot that I have no intention to leave the couch.

I hope youé had a nice day,
Quinny